
Once upon a time, years ago, I loved to decorate cakes. I only had one child at that stage, and he was a good little helper in the kitchen, and we had lots of time to do ‘stuff’. Nowadays he’ll just bounce a ball in the kitchen while I’m cooking. (Is there any sound more annoying than a ball just bouncing bouncing bouncing on hardwood floors?) So, I watched a few YouTube tutorials and decorated a few cakes, and even made a little bit of money. And then a friend asked me to make this cake. A die hard Star Wars fan, he was turning 40 and this was his dream cake. It took me 5 days but I was super happy with the result, and so was he. At the time, I took photos of each step as I hoped to document the process one day. Please excuse the quality as they’re about 5 years old and from my pre iPhone days!
Planning

Before I did anything, I needed to find a template. I was lucky that one of my friends had this huge Millennium Falcon model that I could refer to, and I managed to find a template online. I printed it onto A4 paper, then enlarged it and copied it on 4 x A3 sheets and taped it together.
The ingredients

I used a basic chocolate mud cake recipe and multiplied the ingredients by 6! I think there’s about 3kg of chocolate in total!
Baking

I used 3 big roasting tins to bake the cakes – each tin fitted 2 cakes worth of ingredients so that was 6 cakes in total. I could only fit one in my oven at a time, and each one took over 2 hours to make and bake. It was a busy day in my kitchen!
Cutting and shaping

This part was a bit nervewracking. I didn’t want to make a mistake and have to worry about sticking pieces back together. It was a big learning curve as I had to shape some pieces with rounded edges.
Ganache

This was a long and painful process. In all the cakes I decorated, I never really fully mastered the knack of a smooth ganache finish. You can see all of the lumps and bumps still visible but I wasn’t too worried as I knew there would be plenty of decorative pieces covering it. After everything was covered, I glued all of the pieces on with more ganache. It was assembled on a thick piece of plywood covered in black wrapping paper.
Fondant

Another skill I never really mastered was estimating how much fondant I would need to cover a cake. For some reason, and one I still don’t know to this day, I didn’t buy gray fondant. No, I bought about 2kg of white fondant and coloured it gray. It took AGES to knead in the food colouring. And then I had to roll it out. I commandeered our dining table and managed to roll out 2 huge pieces which I very carefully laid on the cake and smoothed out. The join blended together quite well, I don’t even think you can see it in the photo.
Decorating

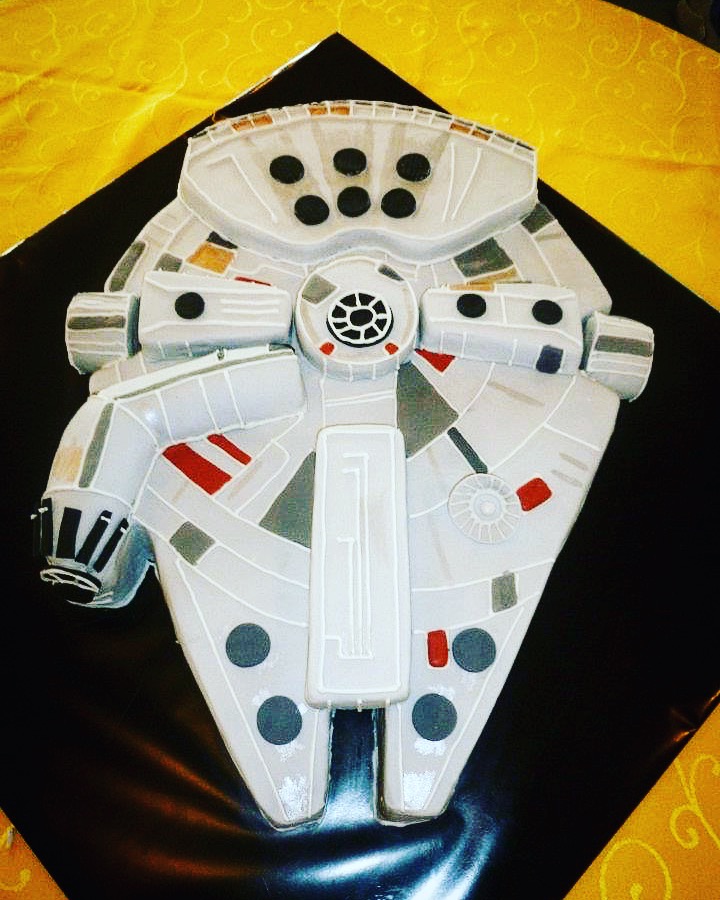
And then it was time to put the finishing touches on it. I needed a steady hand for the piping as I hadn’t had much practice beforehand. The cake measured about 20×24″ and weighed a lot. To transport it to the party, I covered the boot of the car in wet paper towels to stop the cake sliding around. I remember telling my husband that I had to drive so if anything happened I only had myself to blame! Fortunately though, it arrived safe and sound and was a great success.
This was one of the last cakes I decorated with fondant. There’s too much humidity here in Auckland, which makes the fondant sticky, and I grew tired of the artificial taste. It was also one of the last cakes I ‘sold’. Whilst they were fun to make, I always got too stressed about the finish of them, not to mention getting them to venues. Nowadays, I generally only make decorative cakes for family ( I will always make my kids cakes) and I now use buttercream which has a much nicer taste and is much easier to use.
I’ll leave you with this
© Once Upon An Egg. All images and content are copyright protected. Please don’t use my images without permission. If you want to republish this recipe, please re-write it in your own words, or link back to this post for the recipe.

You did an amazing job! With such perfection and talent, you should be proud of yourself. I have never seen anything so great like this. Great job!
LikeLike
Thank you so much! It was a huge project but definitely a fun one 🙂
LikeLike