

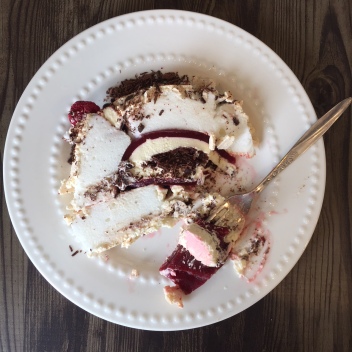
Panic stations – Christmas is only 8 weeks away! It’s never too early to start planning your Christmas Day menu and it wouldn’t be a kiwi Christmas without some sort of pavlova. This is the ultimate in Kiwi mash-ups. We’re combining the iconic Jelly Tip ice-cream with a good old pav – tart raspberry jelly, dark chocolate, luscious cream and billowy marshmallow meringue all rolled up for the pavlova of your dreams.
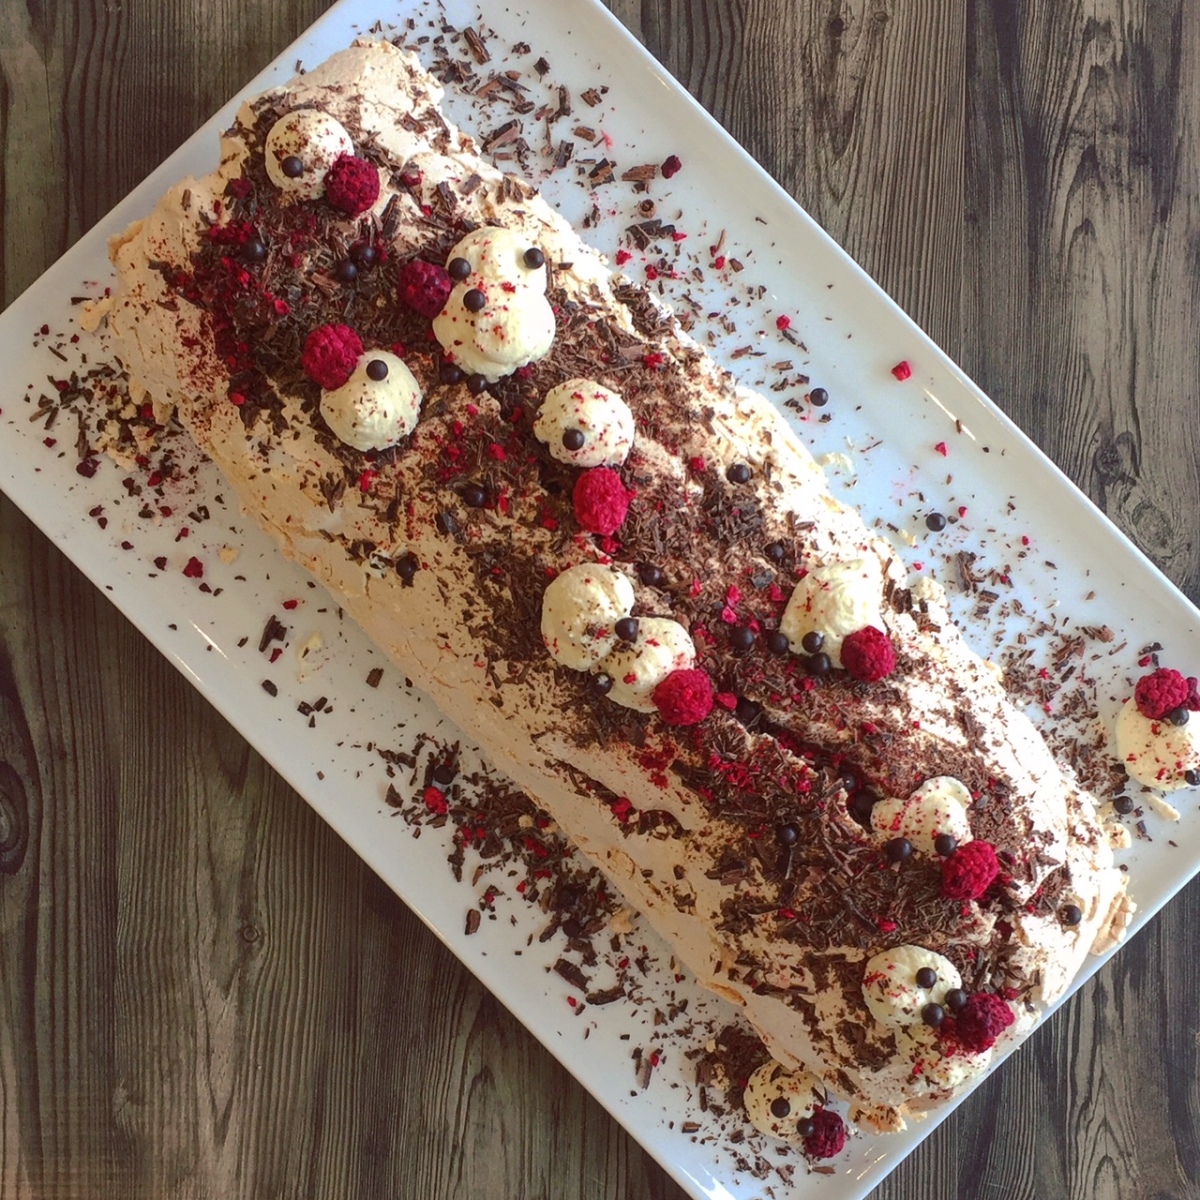
I’m sure everyone has had a pav deflate on them at least once, I know I have, but this one is foolproof. It’s supposed to deflate!! And don’t be scared off by rolling it up because it’s going to crack no matter what. You can gussy it up any which way you like, I chose freeze dried raspberries, grated dark chocolate, more cream and some tiny chocolate balls. It’s going to be a definite show stopper at the Christmas dinner table.
For the pavlova
Ingredients
6 egg whites (I used size 7)
400g caster sugar
1 teaspoon cornflour
1 teaspoon vanilla extract
1 teaspoon white wine vinegar (white vinegar is also fine)


To assemble the pavlova, you will also need:
1½c cream, whipped to soft peaks
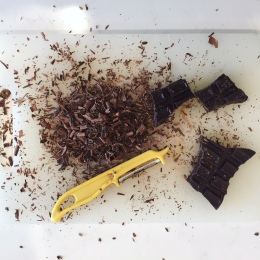
200g dark chocolate, grated or shaved
Freeze dried raspberries to decorate
Method
Preheat your oven to 150°. Grease and line a 35x25cm slice tin and set aside (see notes.)
In the bowl of a stand mixer fitted with the whisk attachment, beat the egg whites until soft peaks form.
Gradually add the sugar, one tablespoon at a time. This will take several minutes.
When all of the sugar has been incorporated, the meringue should be thick and glossy.
Add the cornflour, vanilla and vinegar and whisk for another minute.
Gently plop the batter into the prepared tin and smooth the top.

Bake for 25 minutes (it will look pale beige and crusty) then remove from the oven and allow to cool for 15 minutes. The pavlova will deflate – that’s ok.
Lay a piece of baking paper on a flat surface and carefully turn the pavlova out onto it. If you are not using it straight away, cover it with a clean tea towel and leave it at room temperature.
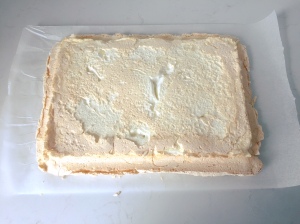
Allow to cool completely.
For the jelly
Ingredients
35g freeze dried raspberry powder (I like Fresh As)
2½ tablespoons caster sugar
1 tablespoon powdered gelatin
1½c cold water
Method
Line a 35x25cm slice tin and set aside. Make sure the baking paper comes up over the sides as this will be the ‘handle’ when you remove it later. (Use the same one you cooked your pavlova in.)
In a small bowl, whisk together the raspberry powder, sugar and gelatin. Set aside.
Add the water to a small pot and bring to a simmer over a medium heat.
Once the water is just starting to simmer, turn it down to low, add the raspberry powder etc, and whisk together. Keep whisking until the sugar and gelatin have dissolved – about 1 minute.
Pour it into the prepared tin and refrigerate until set.
To assemble
Make sure you’ve got everything prepared and ready to use: a serving platter, the pavlova, jelly sheet, whipped cream, and chocolate. You’ll also need a spatula and offset palette knife (for easier spreading.)
First up, gently lift the baking paper and pavlova onto the serving platter. Using the baking paper as a ‘handle’, lift the jelly sheet out of the tin. Invert it on top of the pavlova, making sure it’s centred, and very gently peel away the paper.
Next up is the cream – gently spread about 1½c of whipped cream over the pavlova, leaving a border of about 2cm all around the edges.
Sprinkle with most of the chocolate – save a bit for sprinkling on top.


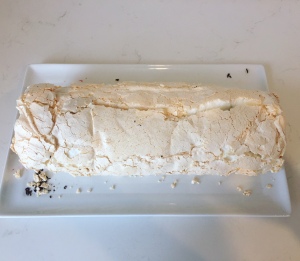
Now, the tricky part. We need to roll this masterpiece. Lift up the long edge of the baking paper and roll the pavlova up and over, into a log, removing the baking paper as you go.
The pavlova should now be seam side down on the serving platter. It will be cracked and that’s OK – it’s going to crack no matter what.
Decorate your masterpiece with the remaining cream, chocolate, and freeze dried (or fresh) raspberries.
Refrigerate until serving.
Notes
- Take your time to carefully line the tin for the pavlova. The batter is not heavy enough to push the baking paper back out to the corners so your pavlova will form around where the paper creases. I cut strips of paper for the sides, instead of just using a whole sheet.
- You can prepare both the pavlova and the jelly the day before serving. Assemble the day of serving.
© Once Upon An Egg. All images and content are copyright protected. Please don’t use my images without permission. If you want to republish this recipe, please re-write it in your own words, or link back to this post for the recipe.

Pavlova is one of my favourite, I don’t make it as often, but that’s about to change 😀
LikeLike
Thanks, this is now my husbands favourite dessert
LikeLiked by 1 person
[…] am a big fan of freeze dried fruit. I often use it to flavour my kombucha or use it in jellies. The Fresh As range is amazing as not only do they freeze dry fruit, but also herbs which you can […]
LikeLike
[…] before my love of Fresh As freeze dried fruit. I’ve used it plenty of times, like here and here. This time I’ve used it to add a whole lot of tang to the raspberry jelly which sits atop of […]
LikeLike
[…] Yes, we need a lot of egg yolks. Save the whites – you can freeze them or turn them into macarons or a pavlova. […]
LikeLike